General
This topic describes the general setup of a capture profile.
These are only the general settings. For more capture profile settings, see Capture Profile Configuration.
-
Under
Identification, roles, and security, fill out the following fields:
Field name Description Name The name of the capture profile.
The name should clearly describe the documents that are captured with this profile. Examples: invoices, purchase orders, hiring packets. Two capture profiles must not have the same name. The name cannot begin nor end with a space.
Group A group where the capture profile belongs to for organizational purposes.
A unique group name must be defined if the user wishes to enable Toggle Grouping in other parts of the application. Otherwise, the default value is set to "user".
Description The description of the capture profile.
The description can help to differentiate capture profiles with similar names. The description is displayed along with the name when selecting a capture profile in Configuration: Capture Profiles.
Allowed roles Roles are configured in the Security Manager (), and they define the permissions for each user. For example, which roles can access this capture profile or which portion of this capture profile can be selected here or in the Security Manager.
Security is not available in stand-alone mode.
-
Click
Password Protection Settings to only allow editing, copying, deleting, exporting, or importing
with a password.
The Capture Profile Protection Settings dialog box appears, where you can set your preferences. Click Save or Cancel to close it.
-
Under
Batch type, select whether the related batch is local to the computer or shared through the
capture server.
Shared storage locations should be UNC paths. For example: //{PC-NAME}/{Folder}/{Folder}.
-
Under
Storage options, select a storage location from the list or create a new one by clicking
New Location.
Clicking New Location opens the Storage Location Definition dialog box. If you save the new storage location, it is automatically selected.
The storage location specifies the directory where new batches are stored when using this capture profile. We recommend to use a different storage location for each capture profile.
Storage locations can be local folders, UNC paths, or mapped drives. When selecting a storage location, note that all computers that process documents through this capture profile must have full access to this location. Local folders are not recommended because they are limited to the local computer. If a new computer was added, the storage location would not be valid for the new computer.
-
Browsing to places the UNC path in the Storage Directory field. When running in a network server or a network station, we strongly recommend using UNC paths.
-
Storage locations can also be defined in Configuration: Storage.
-
-
Under
Batch naming, select the naming method for batches:
-
Automatic batch naming uses the current date and time to generate a unique batch name automatically. The batch name can still be changed when batches are created. The default naming format is yyyyMMdd.hhmmss.
-
Manual batch naming requires the user to enter a batch name when the batch is being created.
-
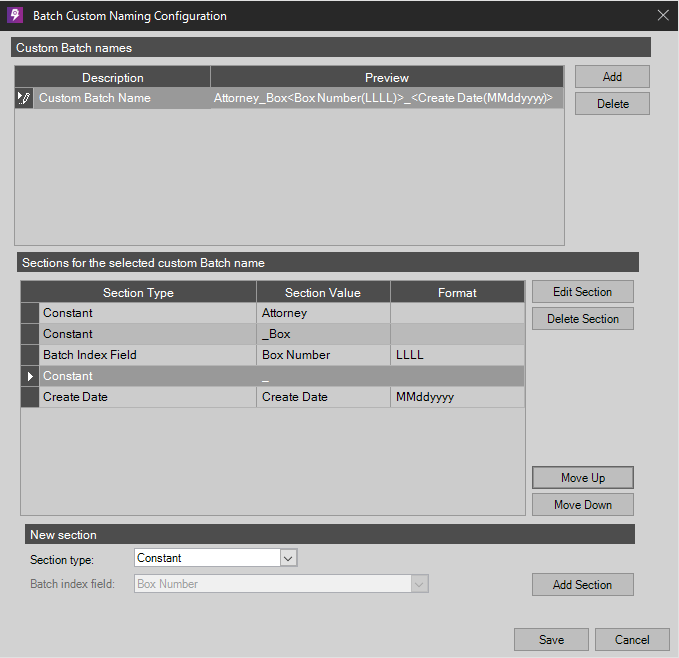
Custom batch naming lets the user define multiple batch name templates based on formatted dates and constant string values. When creating a new batch, the user is able to select the batch name from the list created for the defined templates.
If Custom is selected, the Custom Setup button appears. Clicking it opens the Batch Custom Naming Configuration dialog box.
The example below incorporates a batch index field, where the batch naming format is "Attorney_Box{box_number}_MM.dd.yyyy". The user can later define only the box number (for example, 1234) to create the batch name "Attorney_Box1234_03.22.2011." Click Add Section to add new elements to the batch name.
When dealing with multiple stations or specific standards, you can select the check box to disable users from naming batches when new batches are created.
-
-
Under
Batch retention, select a batch retention policy for the capture profile.
The batch directory may contain all or most of the following: the batch database, recycle bin for the batch, blank pages detected at capture time, the batch images and any OCR-d files contained in the batch. Keeping or archiving the batch lets the user re-process the batch without rescanning. Users should take the disk space needed for these files into consideration when selecting a retention policy.
-
Keep Batch: The batch directory is kept and each batch is marked as closed in the Batch Manager.
-
Archive Batch: The batch directory is archived to the specified directory either immediately or after the user specifies the number of days. When archived, the batch is removed from the Batch Manager but the user can imported it back at a later date.
-
Delete Batch: The batch directory is deleted and the batch is removed from the Batch Manager either immediately or after the specified number of days.
Users can keep the retention date when reopening the batch to retain the exact date it was originally run.
-