Welcome to AutoStore Process Designer
AutoStore Process Designer is an integrated environment for developing and administering AutoStore workflows.
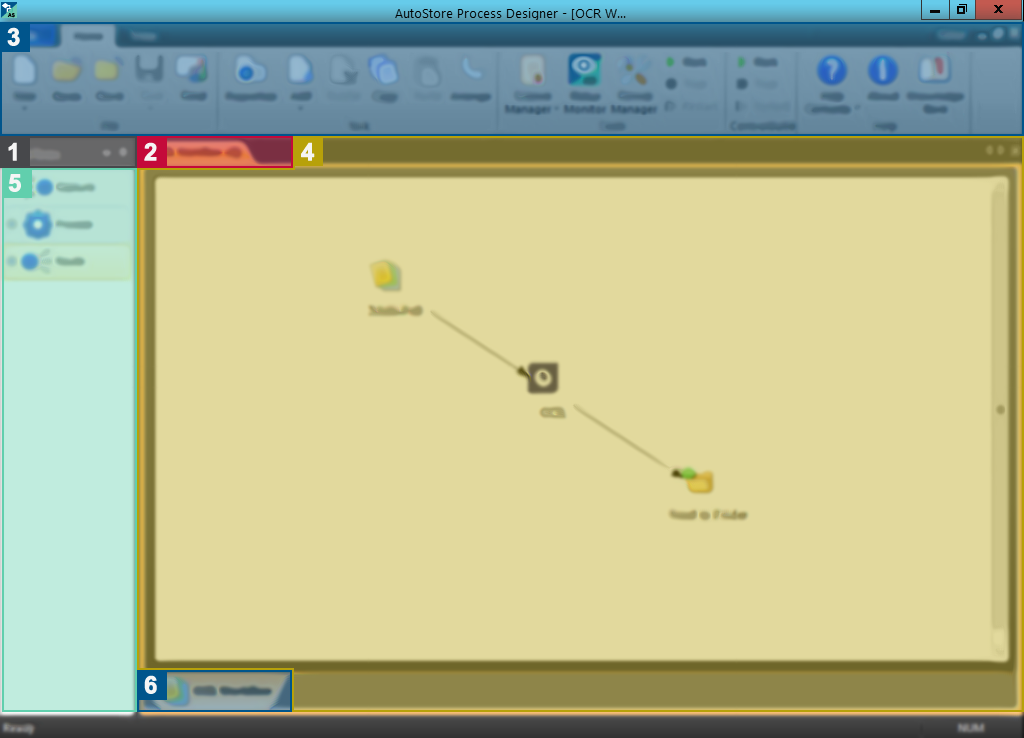
AutoStore Process Designer provides a visual user interface to create and edit configurations. You use it to create and administer workflows that AutoStore uses to capture, process, and route documents. It provides a workflow editor to create and edit configurations that define tasks and specify workflows. It also provides access to applications to review licensing for product components, to monitor status messages generated by the server, and to configure, start, and stop the AutoStore service.

| Key | UI Element | Description |
|---|---|---|
| 1 | Toolbox | Displays icons for registered components that you can add to workflows. Like other windows in the AutoStore Process Designer, you can drag, dock, or hide the Toolbox window. |
| 2 | Configuration tab | This tab displays the name of a configuration file currently open in the AutoStore Process Designer. A configuration file defines scripts for AutoStore processes. |
| 3 | Ribbon | Provides a command interface that users can use to access functional components of the AutoStore Process Designer. Command buttons are arranged on the File, Home, and View tabs. |
| 4 | Configuration editor | This area allows you to create and edit configurations. Open configurations are arranged by tabs at the top of this space while tasks within a configuration are represented by their own tasks. You can drag components from a component tray to this space to assemble and configure a process. A complete process must always start with a single capture component and end with a single route component. It may optionally have one or more process components. The sequence of arrows defines the order in which AutoStore processes components in workflows that are defined by forms or actions in the capture component settings. The process sequence in the illustration includes the Multi-Poll capture, OCR process, and Send to Folder components. |
| 5 | Component trays | Registered components are arranged in three collapsible trays in the Toolbox window. There is one tray each for Capture, Process and Route components. You can expand or collapse any of these trays by clicking the tab at the top of a tray. You can click the menu at the top of the Toolbox window to choose components displayed on each tray and to customize how they are displayed. |
| 6 | Task tab | This tab displays the name of a task with the icon of the capture component in the workflow. In the illustration, the Multi-Poll component icon is displayed on the tab. |
