Feature Access Configuration
Use the Feature Access settings in the Admin Tool to configure feature access levels for different users and groups.
To configure Feature Access settings, do the following:
-
From Admin Tool, click .

-
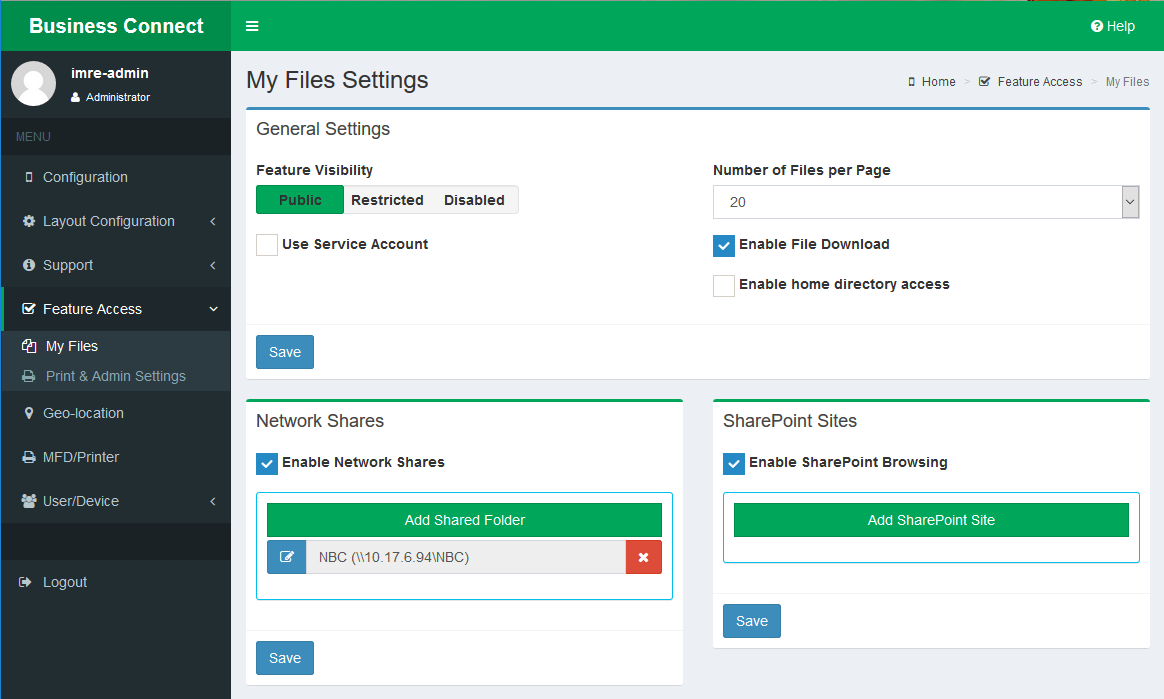
Configure the My Files Settings.
Parameter Description Feature Visibility Specifies which users/groups can view My Files. - Public allows any authorized user to access the My Files through their devices.
- Restricted expands the Access Control List options, in which you can provide access to specified groups or users. You can then click the filter button to search or select from a filtered list of users in the Select Users or Groups dialog box. Click the Add button to add a specified user or group to the list. Click the Delete button to delete a user or group from the list.
- Disabled prevents any users from viewing My Files.
Use Service Account Turn on this option to expand Service Account to run My File service under specified user credentials. The Service Account credentials are used to fetch user files and folders. If you turn off this feature the service will log on as Local System, and users’ files and folders will be fetched using their own credentials. Number of Files per Page Specifies the maximum number of files to display per page. Enable File Download Specifies whether users can download a file from My Files for viewing. Enable home directory access Specifies whether Business Connect client users can view their home directory. - Clear to prevent users from viewing their home directory.
- Select to allow users to view their home directory. Turning on this feature expands the Manual Set check box. Clear Manual Set to use the default home directory, which is specified by the homeDirectory attribute in Active Directory/LDAP. Select Manual Set to specify the home directory path manually.
Enable Network Share Specifies whether users can view network share folders. - Clear to prevent users from viewing network shared folders.
- Select to allow users to view network shared folders. Turning on this feature expands the Network Share options. To add a shared folder, click the Add Share Folder button to open the Folder Share Settings dialog box. In this dialog box, enter the Address, and an Alias that identifies the folder to users. You may clear the Public Access check box to specify users or groups who can access the folder.
Enable SharePoint Browsing Specifies whether users can view SharePoint site folders. - Clear to prevent users from viewing SharePoint sites.
- Select to allow users to view SharePoint folders. For details see Configure SharePoint Sites (Optional).
- Click Save.
-
Select .

-
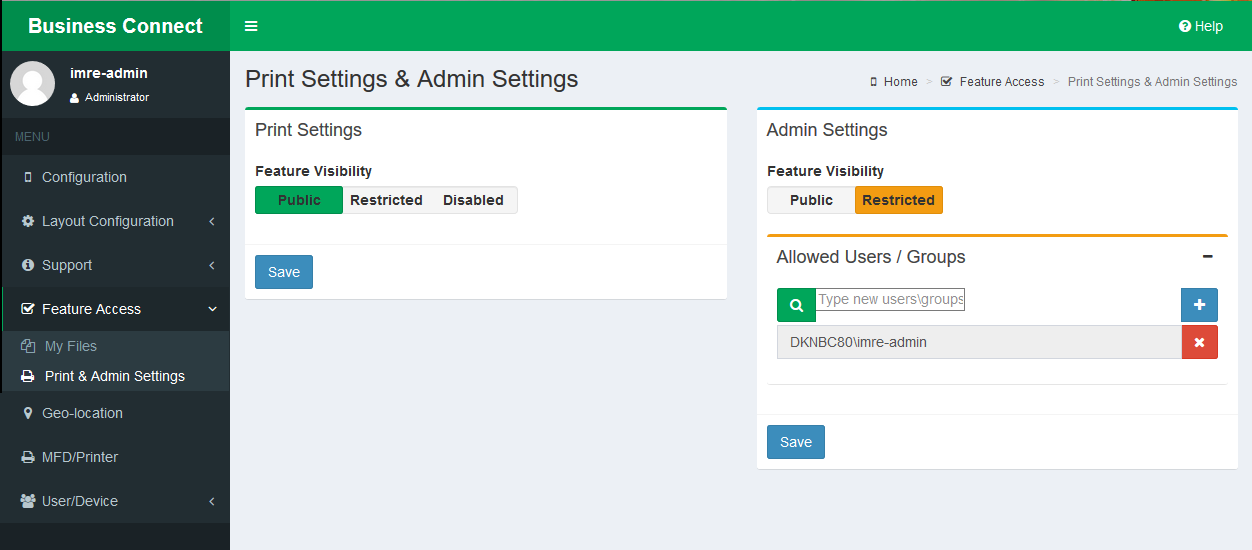
Configure the Print & Admin Settings.
Parameter Description Print Settings Feature Visibility Specifies whether users can see the Print Queue and Express Print buttons. - Public displays the Print Queue and Express Print buttons for all users.
- Restricted expands the Access Control List options, in which you can display the Print Queue and Express Print buttons to specified groups or users. You can then click the filter button to search or select from a filtered list of users in the Allowed Users or Groups dialog box. Click the Add button to add a specified user or group to the list. Click the Delete button to delete a user or group from the list.
- Disabled hides the Print Queue and Express Print buttons from all users.
Admin Settings Feature Visibility Specifies whether users can see the Admin Tool button. - Public displays the Admin Tool button for all users.
- Restricted expands the Access Control List options, in which you can display the Admin Tool button to specified groups or users.
- You can then click the filter button to search or select from a filtered list of users in the Allowed Users or Groups dialog box. Click the Add button to add a specified user or group to the list. Click the Delete button to delete a user or group from the list.
- Click Save.
